End-of-tenancy inspection: what tenants and landlords need to know
11 de agosto de 2026
14 min de lectura
Discover what an end-of-tenancy inspection entails and how it benefits both tenants and landlords. Understand your rights and responsibilities!
An end-of-tenancy inspection, also called a check-out inspection, is the formal assessment of a property's condition at the moment a tenancy ends. Its purpose is to compare what the inspector finds with the original check-in inventory, identifying any damage, missing items, or cleaning shortfalls that might justify deductions from the tenant's deposit. The Tenancy Deposit Scheme (TDS), Shelter England, and gov.uk all recognise the check-out report as the central document in any deposit dispute. Getting it right protects both sides.
Why it matters:
Deposit evidence. The check-out report, alongside the check-in inventory and photographs, is the primary evidence adjudicators use when a deposit is disputed.
Timing for return. A clear, agreed report speeds up the deposit repayment process for everyone.
Dispute prevention. A thorough record reduces the chance of disagreements escalating to formal adjudication.
Official record. Deposit-scheme adjudicators at the TDS, the Deposit Protection Service (DPS), and MyDeposits rely on contemporaneous, dated documentation to reach fair decisions.
Key takeaways
A thorough, contemporaneous check-out report compared against the original check-in inventory is the single most important factor in a fair deposit outcome for both tenants and landlords.
Point
Details
Attend the check-out
Tenants are not legally required to attend, but being present reduces disputes significantly.
Evidence chain matters
Check-in inventory, check-out report, and timestamped photos form the core evidence adjudicators rely on.
Landlord bears the burden
Without a dated check-in record, landlords often lose deposit disputes regardless of actual property condition.
Key deadlines
Deposits must be registered within 30 days; undisputed repayments are expected within 10 working days of agreement.
Hauzed supports the process
Hauzed helps landlords and tenants manage verified profiles, schedule visits, and keep documents organised in one place.
Temas relacionados
#what is an end-of-tenancy inspection#end-of-tenancy check#how to prepare for an inspection#questions about end-of-tenancy inspections#end-of-lease inspection checklist#what to expect in a tenancy inspection#importance of end-of-tenancy inspections#tenancy inspection guidelines
The check-out process follows a predictable sequence, whether it is carried out by a landlord, a letting agent, or a professional inventory clerk.
Before the appointment, the landlord or agent arranges a time, ideally on the tenant's final day. The tenant should receive reasonable notice, and both parties should have a copy of the original check-in inventory to hand.
On arrival, the inspector works through the property room by room, comparing current condition against the check-in record. They note cleaning levels, any damage beyond fair wear and tear, missing items, and the condition of fixtures and fittings. Photographs are taken at each stage.
Meter readings are recorded for gas, electricity, and water. Keys, fobs, and any other access items are counted and returned.
The check-out report is then compiled. According to CertNudge's landlord checklist, a proper report should be dated and include the property address, tenancy details, inspection date and time, who attended, room-by-room notes, photographs, meter readings, and any proposed deductions. Both parties ideally sign a copy at the time, which significantly reduces later disagreements.
Pro Tip:When taking check-out photographs, use the same angles and lighting as the original check-in photos. Side-by-side comparisons are far more persuasive to an adjudicator than standalone images taken from a different position.
When does the inspection happen, and who should attend?
Timing matters more than most people realise. There are three common scenarios, and they carry different evidential weight.
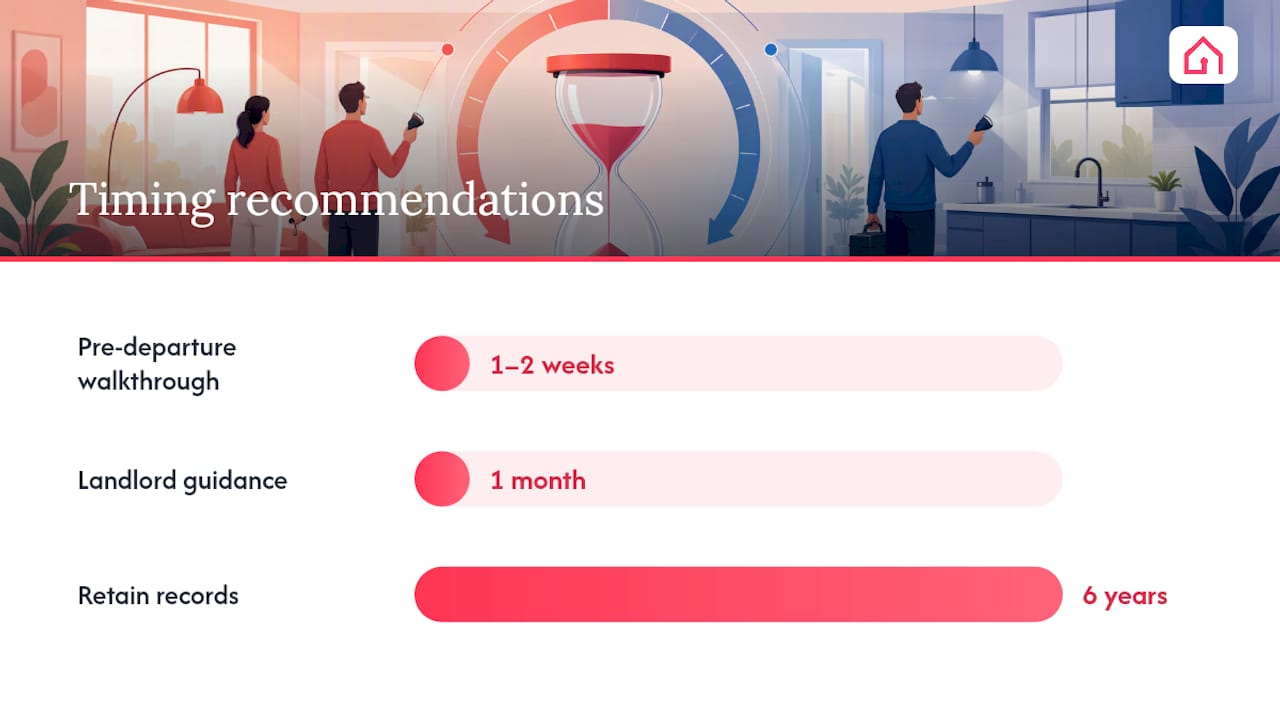
Pre-checkout inspection (advisory). Some landlords or agents carry out a walk-through one to two weeks before the move-out date. This is useful for flagging issues the tenant can still fix, but it does not replace the formal final check-out. A pre-departure inspection is advisory and cannot substitute the contemporaneous final report.
Final-day check-out (contemporaneous). This is the gold standard. Carrying out the inspection on the last day of the tenancy, as soon as the tenant has vacated, produces the strongest evidence. The TDS guide to inventories notes that delays between vacating and inspection invite challenges, because intervening changes such as dust or third-party access cannot be ruled out.
After vacating. If the tenant has already left, the inspection still takes place, but the tenant can only contest findings after receiving the final report.
Should you attend? Shelter England's guidance is clear: tenants are not legally required to attend a check-out inspection, but being present reduces later disputes considerably. You can raise concerns in person, agree sign-off where appropriate, and avoid the weaker position of contesting a report you never saw being compiled.
Practical attendance points:
Tenants should confirm attendance in writing beforehand.
If you cannot attend, ask for the report to be sent to you promptly and respond in writing with any disagreements.
The report should record who was present, including whether the tenant attended or declined.
How do inspections affect deposit deductions?
The inspection report does not decide deductions on its own. It sits within an evidential chain that adjudicators at the TDS, DPS, and MyDeposits use to reach decisions.
The evidential chain
A landlord proposing deductions needs: the original check-in inventory, the check-out report, photographs from both visits, and invoices or receipts for any remedial work. TDS guidance is explicit that without a dated inventory and photographs, landlords find it difficult to justify withholding deposit funds at adjudication. The evidential burden sits with the landlord to show that damage occurred during the tenancy.
Damage versus fair wear and tear
Not every mark or scuff justifies a deduction. Fair wear and tear refers to the gradual deterioration that occurs through normal, reasonable use. A few practical examples:
Fair wear and tear: Small scuffs on painted walls after a two-year tenancy; carpet pile flattening in a hallway; minor fading of curtains.
Chargeable damage: A large stain on a carpet; a broken door handle; a burn mark on a worktop; a cracked tile.
The age and condition of an item at check-in matters too. An adjudicator will not award the full replacement cost of a five-year-old carpet if it was already worn at the start of the tenancy.
What adjudicators treat as decisive
The check-in inventory and check-out report, taken together with timestamped photographs, form the central evidential chain relied upon by deposit-scheme adjudicators. A landlord who cannot produce a contemporaneous, dated check-in record is in a weak position, regardless of the actual state of the property at check-out.
The three government-authorised deposit-protection schemes in England and Wales — the Tenancy Deposit Scheme (TDS), the Deposit Protection Service (DPS), and MyDeposits — all operate as neutral adjudicators. They do not favour landlords or tenants; they follow the evidence. Consistent terminology and matching photographic angles between check-in and check-out strongly influence adjudication outcomes.
How should you prepare as a tenant? An end-of-tenancy checklist
Good preparation before the check-out is the single most effective way to protect your deposit. Work through this checklist in the days before you hand back the keys.
Deep clean every room. Match the standard recorded at check-in. Pay particular attention to the oven, extractor fan, bathroom grout, and skirting boards. If you use a professional cleaning company, keep the receipt.
Repair minor damage you can fix. Fill small nail holes, replace blown light bulbs, and tighten loose fixtures. Keep receipts for any materials or tradespeople you use.
Return all fixtures to their original position. Shelving, curtain poles, and furniture should be where they were at check-in.
Take timestamped photographs of every room. Do this on your final day, after cleaning, before you leave. Photograph walls, floors, appliances, and any areas that were noted in the check-in inventory.
Record final meter readings. Note gas, electricity, and water readings and photograph the meters. Send readings to your energy suppliers on the day.
Return all keys, fobs, and access items. Count them against the check-in record and confirm receipt in writing.
Keep copies of everything. Retain your check-in inventory, any correspondence with the landlord or agent, receipts, and your own photographs for at least six years.
Pro Tip:Ask your landlord or agent for a pre-departure walk-through one to two weeks before move-out. Use any feedback to fix issues while you still have time. Just remember: this advisory visit does not replace the formal final check-out, so keep your own photographic record regardless.
MyDeposits guidance recommends that landlords provide end-of-tenancy guidance one month before move-out. If yours has not done so, you can still follow this checklist independently. For a more detailed move-out deposit checklist, Hauzed's blog covers the most common causes of deductions and how to avoid them.
What if there's no check-in report, or you disagree with the findings?
Missing baseline evidence does not mean you are powerless. It does mean you need to act quickly and document everything.
If you are a tenant with no check-in report:
Gather any evidence of the property's condition when you moved in: emails, photos you took at the time, or written communications with the landlord.
Send a written challenge to the landlord or agent as soon as you receive the check-out report. State clearly which findings you dispute and why.
Preserve all receipts, communications, and your own photographs.
If agreement cannot be reached, raise a dispute with the deposit-protection scheme holding your deposit. The TDS, DPS, and MyDeposits all offer free adjudication services.
If you are a landlord with weak check-in evidence:
Look for other contemporaneous proofs: earlier inspection photos, emails describing the property's condition, or receipts for work carried out before the tenancy began.
Document any negotiation attempts in writing.
Be realistic: Legaldocuments warns that landlords without a contemporaneous, dated inventory and photographs often lose deposit disputes, with the deposit returned to the tenant in full.
How deposit-scheme disputes work:
The adjudication process is free for both parties. You submit your evidence, the other party submits theirs, and an independent adjudicator decides. The process typically takes a few weeks. Crucially, the burden of proof sits with the landlord throughout. If the evidence is evenly balanced or absent, the decision tends to favour the tenant.
Are professional inventories and independent check-out reports worth it?
For most furnished lets and higher-value properties, yes. A professional inventory clerk produces a neutral, standardised report with dated photographs and a consistent format that mirrors the check-in document. That consistency is exactly what adjudicators find persuasive.
The practical value of a professional report comes down to three things: neutrality (neither party compiled it), detail (room-by-room notes with photo references), and timing (carried out on the day of check-out). When a dispute reaches adjudication, a signed report from an independent clerk carries considerably more weight than a landlord's own notes.
When a professional report is most worthwhile:
Furnished lets with high-value items (appliances, furniture, artwork)
Properties with a history of deposit disputes
Tenancies where the landlord and tenant relationship is already strained
Longer tenancies where fair wear and tear calculations are more complex
When it may be less necessary:
Unfurnished lets with a straightforward check-in record
Short tenancies where condition changes are minimal
Cases where both parties have a strong, agreed check-in inventory and good communication
When choosing a supplier, look for dated, signed digital reports with clear photo references and a format that mirrors the original check-in inventory. The Association of Independent Inventory Clerks (AIIC) and the Association of Professional Inventory Providers (APIP) are the main professional bodies in the UK.
Record keeping and timelines to remember
Knowing the key deadlines keeps you on the right side of deposit-scheme rules and gives your evidence the best chance of holding up.
Key timelines to keep in mind:
Deposit registration. Landlords must register a tenancy deposit with an authorised scheme within 30 days of receiving it.
Repayment of undisputed sums. The TDS Code of Recommended Practice sets an expectation that agreed repayments are completed within 10 working days once deductions are agreed.
Document retention. Keep all tenancy records, including check-in and check-out reports, photographs, receipts, and correspondence, for at least six years.
Dispute window. Raise a dispute with your deposit-protection scheme promptly after receiving the check-out report. Do not wait weeks before challenging findings.
Why contemporaneous dates matter: an undated photograph or a report compiled days after the tenant left is far easier to challenge than one timestamped on the final day. Digital backups stored in cloud services such as Google Drive or iCloud add an automatic timestamp and protect against accidental deletion.
Deadline or action
Timeframe
Register deposit with authorised scheme
Within 30 days of receipt
Carry out check-out inspection
On or as close to final day as possible
Repay undisputed deposit sums
Within 10 working days of agreement
Retain tenancy records and evidence
At least 6 years
Raise a deposit dispute
Promptly after receiving check-out report
For a broader overview of how deposit schemes operate, the Hauzed guide to tenancy deposit schemes explains the TDS, DPS, and MyDeposits adjudication processes in plain language.
Most deposit disputes are preventable — here's the honest truth
The paperwork around check-outs can feel tedious, but the disputes that reach adjudication almost always share one feature: someone skipped a step that would have taken ten minutes at the time.
Landlords who issue a written move-out guide a month before the end of the tenancy, carry out a pre-departure walk-through, and then conduct a contemporaneous final check-out with consistent photographs rarely end up in adjudication. Tenants who attend the check-out, take their own photos on the final day, and keep receipts for professional cleaning are in a strong position even if a dispute does arise.
The habits that prevent disputes are not complicated. For landlords and agents:
Send end-of-tenancy guidance one month before move-out.
Offer a pre-departure advisory inspection.
Use the same photographic angles and terminology as the check-in.
Provide the tenant with a copy of the final report promptly.
For tenants:
Attend the check-out if at all possible.
Take timestamped photographs on your final day.
Keep your check-in inventory and all receipts.
Respond to any proposed deductions in writing, quickly.
The evidence that wins at adjudication is not sophisticated. It is simply consistent, dated, and gathered at the right moment. Most disputes are not about what actually happened to a property. They are about who can prove what happened.
Hauzed makes the rental process clearer for both sides
Keeping track of inspection photos, receipts, signed reports, and tenant communications across email threads and phone messages is where things go wrong. Hauzed is a verified rental marketplace built to reduce exactly that kind of friction, giving landlords and tenants a single, organised place to manage the rental relationship from listing to move-out.
With Hauzed, landlords can schedule property visits, manage conversations with verified tenants, and keep media and documents in one place rather than scattered across inboxes. Tenants get a stronger, verified profile and a clear record of their interactions. The AI tools, including Hauzer for tenant matching and Echo for smart follow-up, reduce the manual back-and-forth that slows down the check-out process on both sides.
If you are a landlord preparing for a tenancy end, or a tenant wanting to move out with your deposit intact, explore Hauzed's verified rental platform and see how a more organised rental workflow makes the whole process less stressful.
Sources
These official and industry sources cover deposit-scheme adjudication, inventory guidance, and practical checklists in detail. Keep a copy of your check-out report and consult the deposit-scheme pages directly for dispute procedures.
This article is general information, not a substitute for advice from a qualified lawyer. Consult a qualified legal professional about your own circumstances before acting on anything here.
FAQ
Do I have to attend an end-of-tenancy inspection?
No, attendance is not a legal requirement. However, Shelter England advises that being present gives you the chance to raise concerns in person and reduces the risk of disputes after the fact.
What should I expect during a tenancy check-out?
The inspector will work through the property room by room, comparing condition against the check-in inventory, taking photographs, recording meter readings, and collecting keys. You should receive a copy of the completed report promptly afterwards.
How clean does the property need to be at the end of a tenancy?
The property should be returned to the same standard of cleanliness recorded at check-in. If the check-in inventory noted a professionally cleaned property, a professional clean at check-out is typically expected. Keep your receipt as evidence.
Can you refuse a tenancy inspection?
A tenant can decline to attend, but the inspection will still go ahead. Refusing access entirely is a separate matter and could breach your tenancy agreement. If you have concerns about the process, raise them in writing with your landlord or agent before the inspection date.
What happens if there is no check-in inventory?
Without a check-in inventory, a landlord's ability to justify deposit deductions is significantly weakened. LegalDocuments.co.uk guidance notes that landlords in this position often lose deposit disputes, with the deposit returned to the tenant in full.